SendBlaster makes it easy to import your mailing list email addresses and contacts. In this post we’ll explain how to do it. Easy and Hassle-free guaranteed!
Step 1. Exporting your contacts from your mail account into CSV file format.
To import your contacts into SendBlaster you need to export a .csv/.txt file (one record, on each row, fields separated by comma, semicolon or tab) from your mail account, and then import it into SendBlaster.
From MSN Hotmail / Live:
- Login to your account and go to Contact list.
- Click Manage and Export.
- Enter the CAPTCHA code and click Export
- You will get a CSV file downloaded which has all your contacts.
From Yahoo!:
- Open Yahoo! webmail in you browser
- Switch to classic view
- Go to Import/Export section
- Click on Export Now button near Microsoft Outlook label
- This will open a new popup window asking for file save on your hard disk.
- Hit Save File.
From Gmail:
- Login to your Gmail account
- Click on Contacts at the left side
- Scroll down and click on Export
- Select the contacts you want to export
- Select the file format – Outlook’s CSV format
- Hit Export Button: this will open a new window asking you either to open or save the file.
- Hit Save File.
From Outlook:
- Select File
- Click Import/ExportExport from the main menu.
- Choose Comma Separated Values (Windows).
- Select ‘Contacts’, and save the exported file.
Step 2. Importing your CSV file into SendBlaster
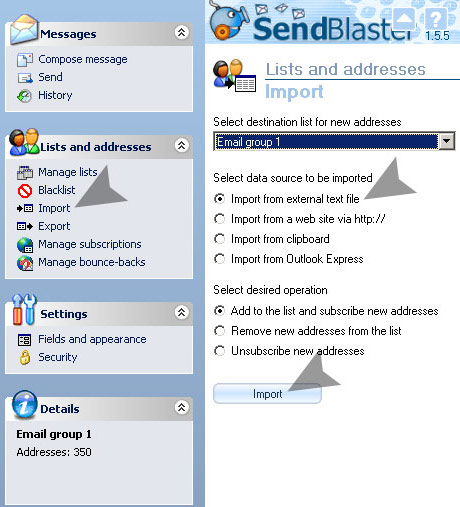
When you have the CSV file with your mailing list stored in your computer:
- Open SendBlaster
- Go to Import section
- Select the mailing list destination for new addresses
- Click Import Button

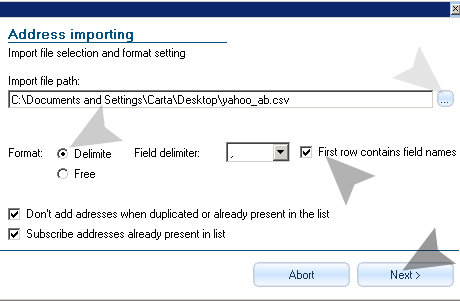
Now choose the CSV file stoed in your computer that you want to import.
- Hit the “…” button
- Select the CSV or TXT file in your hard disk
- Set the format, the field delimiter (usually it’s comma “,” )
- Set first row contains field names (the default option on many softwares)
- Click next
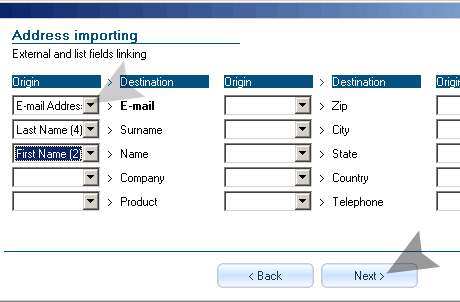
- Now you will have to tell SendBlaster the correct origin fields that will be imported into SendBlaster fields. Only Email Field is mandatory for importing the contact list, if your mailing list is full of your contacts details you can set optional fields as well (for example: first name will be very useful for email merge when you will send your mailings)
- Hit Next button


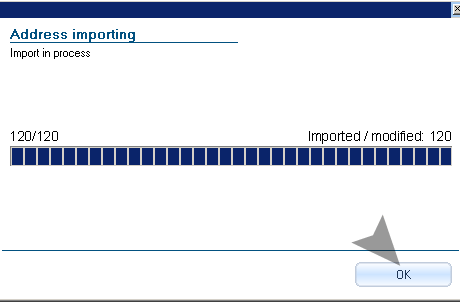
Well done! Importing CSV and TXT files is complete. You can find your imported email addresses and contacts into “Manage Lists” section.

Now you are ready to create and send out your mass mails with SendBlaster!