Add a SendBlaster Newsletter Sign-Up Form to your Facebook Page

Do you own a Facebook Page? Do you want to increase your email subscribers?
We are happy to announce that we now have a simple way to increase your email subscribers using your Facebook Page!

In just a few minutes, you will be able to embed a newsletter sign-up form on your Facebook Page and start collecting email addresses from your fans. Then you can simply download all those new subscriptions in SendBlaster in the usual way. As a result, your distribution list will be updated automatically with the new subscribers coming from your Facebook fans.

Before you start, you will want to make sure you have a text or HTML editor (like Notepad.exe) available and an FTP client (like Filezilla).

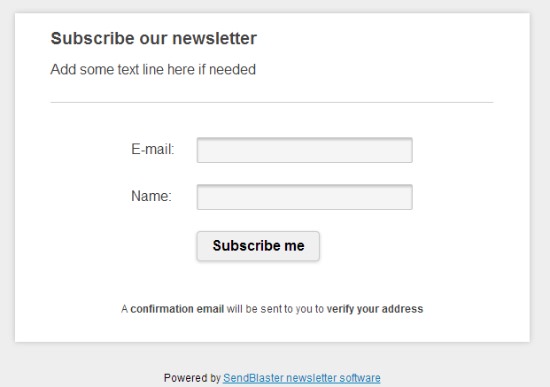
If everything is done correctly, you will get a customizable sign-up form like this on your Facebook Page:

sendblaster signup form


1. Download double-optin script and upload it to your website

First of all, you need to download this script which will connect your Facebook page to SendBlaster.
This ready-made PHP script will allow to send a message to the Facebook fan who asked for an email subscription. The user will then receive a confirmation link embedded in the email. The user can hen simply click the link to confirm the email subscription.

You can download all your newly subscribed email addresses into SendBlaster following usual subscription process (view the How to manage subscriptions tutorial).

To get started just follow these steps:

  • Download this ZIP file
  • Extract files on your local computer
  • Open the newsletter.htm file
  • Find this line of code:
    <form name="form1" method="post" action="http://www.test.com/NL-process.php">

    and replace http://www.test.com with the path to the directory where you will upload the script

      • Open the NL-process.php file with a text editor (i.e. Notepad.exe)
      • Find this line:
        $emailmanager = 'newsletter@test.com';

and replace newsletter@test.com with your real newsletter email.
This should be the email address you use to manage your list in SendBlaster (If you are unsure of the address, you can find it in the “Manage Subscription” section of SendBlaster).

      • Now search for this line of code:
        $scriptUrl = 'http://www.test.com/NL-confirm.php';

        and insert the real path where you will upload the files in place of www.test.com.

      • Open the NL-confirm.php file
      • Find this line
        $emailmanager = 'newsletter@test.com';

        and similarly to NL-process, enter the email address you use for gathering subscriptions.

      • Finally, upload the following files to your website:
        NL-process.php
        NL-confirm.php
        NL-style.css
        NL-ok.htm
        NL-ko.htm
        confirm-ok.htm
        confirm-ko.htm
        newsletter.htm


2. Add the STATIC HTML app to your Facebook Page

Before your SendBlaster newsletter form can appear on your Facebook page you need to install STATIC HTML.
This is a populare free application that allows you to create and add custom tabs on your Facebook Page.

      • Open Facebook
      • Type Thunderpenny Static HTML in the search bar or use this link
      • Click on Go to APP

static html app


      • Click on the big blue button Add Static HTML to Page


static html button


      • Choose a Page where you want to install Static HTML and click on Add Static HTML: iframe tabs
      • A new tab named Welcome will be automatically added in your Page.

static html icon


      • Click on the image to edit the tab. Now you are in the Edit Mode.

static html admin mode


      • Copy all the code included in the newsletter.htm file in the index.html tab, then copy all the code included in the style.css inside the second tab named style.css.
      • Now click on Preview Tab. You should see a preview of your Subscription form.
      • If it looks ok then click on Save & Publish.

Your subscription form will appear as a Tab on your Facebook Page. If it is not visibile, click on “+” in the top navigation list, and select it from the list.

At this point, you can personalize what the tab looks like. Simply click on the pencil icon at the top-right part of the tab.
You will be able to give your subscription form a custom name (ex. Sign Up Now, Newsletter Form) and/or change the Tab Image to make it more personal.

Please keep in mind that you can customize the SendBlaster subscription form any way you like. All you have to do is edit the newsletter.htm and the style.css files.

P.S. You can see the SendBlaster subscription form live on our Facebook Page.